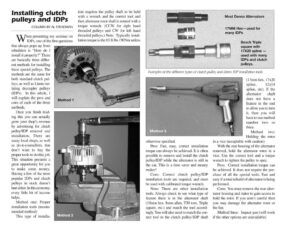
Installing clutch pulleys and IDPs COLUMN BY AL STEADMAN en presenting my seminar on IDPs, one of the first questions that always pops up from rebuilders is “How do I install it properly?” There are basically three differ- ent methods for installing these special pulleys. The methods are the same for both standard clutch pul- leys, as well as Litens iso- lating decoupler pulleys (IDPs). In this article, I will explain the pros and cons of each of the three methods. tion requires the pulley shaft to be held with a wrench and the correct tool and then alternator rotor shaft is rotated with a torque wrench. (CCW for right hand threaded pulleys and CW for left hand threaded pulleys.) Note: Typically instal- lation torque is the 65 ft lbs /90Nm unless Once you finish read- ing this you can actually grow your shop’s revenue by advertising for clutch pulley/IDP removal and installation. There are many local shops, as well as do-it-yourselfers, that don’t want to buy the proper tools to do this job. This situation presents a great opportunity for you to make some money. Having a few of the most popular IDPs and clutch pulleys in stock doesn’t hurt either. In this economy, every little bit of income helps. Method one: Proper installation tools (recom- mended method) This type of installa- Method 2 Most Denso Alternators 17MM Hex—used for many IDPs Bosch Triple square with 17X20 spline — used with many IDPs and clutch pulleys. Examples of the different types of clutch pulley and Litens IDP installation tools. Method 3 otherwise specified. Pros: Fast, easy, correct installation torque can always be achieved. It is often possible to remove and install the clutch pulley/IDP while the alternator is still in the car. This is a time saver and money maker! Cons: Correct clutch pulley/IDP installation tools are required, and must be used with calibrated torque wrench. Note: There are other installation tools. Always check to see what type of feature there is in the alternator shaft (10mm hex, 8mm allen, TSO torx, Triple square, etc.) and match the tool accord- ingly. You will also need to match the cor- rect tool to the clutch pulley/IDP shaft (17mm hex, 17×20 spline, 12×14 spline, etc). If the alternator shaft does not have a feature in the end to allow you to tum it, then you will have to use method number two or three. Method _ two: Holding the rotor in a vice (acceptable with caution) With the rear housing of the alternator removed, hold the alternator rotor in a vice. Use the correct tool and a torque wrench to tighten the pulley to spec. Pros: Correct installation torque can be achieved. It does not require the pur- chase of all the special tools. Fast and easy if a total rebuild of alternator is being performed. Cons: You must remove the rear alter- nator housing and stator to gain access to hold the rotor. If you aren’t careful then you may damage the alternator rotor or the fan. Method three: Impact gun (will work if the other options are unavailable)