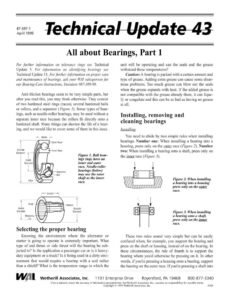
87-397-1 April 1999 All about Bearings, Part 1 For further information on tolerance rings see Technical Update 5. For information on identifying bearings see Technical Update 15. For further information on proper care and maintenance of bearings, ask your WAI salesperson for our Bearing-Care Instructions, literature #87-389-98. Anti-friction bearings seem to be very simple parts, but after you read this, you may think otherwise. They consist of two hardened steel rings (races), several hardened balls or rollers, and a separator (Figure 1). Some types of bear- ings, such as needle-roller bearings, may be used without a separate inner race because the rollers fit directly onto a hardened shaft. Many things can shorten the life of a bear- ing, and we would like to cover some of them in this issue. | Width |= Outside Diameter Figure 1. Ball bear- ings (top) have an Diameter —— inner and outer race. Needle-roller bearings (below) may use the rotor shaft as the inner race. p— =} Rollers a ae Diameter Inside Diameter Retaining Lip Selecting the proper bearing Knowing the environment where the alternator or starter is going to operate is extremely important. What type of end thrust or side thrust will the bearing be sub- jected to? Is the application a passenger car or is it heavy- duty equipment or a truck? Is it being used in a dirty envi- ronment that would require a bearing with a seal rather than a shield? What is the temperature range in which the unit will be operating and can the seals and the grease withstand these temperatures? Caution: A bearing is packed with a certain amount and type of grease. Adding extra grease can cause some disas- trous problems. Too much grease can blow out the seals when the grease expands with heat. If the added grease is not compatible with the grease already there, it can lique- fy or coagulate and this can be as bad as having no grease at all. Installing, removing and cleaning bearings Installing You need to abide by two simple rules when installing bearings. Number one: When installing a bearing into a housing, press only on the outer race (Figure 2). Number two: When installing a bearing onto a shaft, press only on the inner race (Figure 3). , 4 @ 8 Ueexnerealll _—! Figure 2. When installing a bearing into a housing press only on the outer race. Figure 3. When installing a bearing onto a shaft, press only on the inner race. These two rules sound very simple but can be easily confused when, for example, you support the bearing and press on the shaft or housing, instead of on the bearing. In these circumstances, the rule of thumb is to support the bearing where you’d otherwise be pressing on it. In other words, if you’re pressing a housing onto a bearing, support the bearing on the outer race. If you’re pressing a shaft into y/ (41 | Wetherill Associates, Inc. 1101 Enterprise Drive Royersford, PA 19468 800-877-3340 Care is taken to ensure the accuracy of information presented here, but Wetherill Associates, Inc., assumes no responsibility for possible errors. Copyright © 1999 Wetherill Associates, Inc. 6366 Technical Update 43 page 2 the bearing, support the bearing on the inner race. The important thing to remember is to always try to support the bearing, if it’s at all physically possible. You must also make sure that you are not pressing from one race through the balls to the other race. This will put a mark on the races and the balls, compromising the bear- ing’s longevity. How much life has been removed from the bearing will depend upon the amount of pressure that was exerted during the pressing process. Removing If you are salvaging bearings, the removal process becomes very important. The point to remember here is that you hold or press only on the inner race when remov- ing it from a shaft and you hold or press only on the outer race when removing it from a housing. (Note: Removing bearings undamaged from late-style housings can be very difficult, if not impossible.) Sometimes a bearing will come apart during disassem- bly of the alternator. We have found a few tricks for remov- ing the races when this happens. To remove an inner race from a rotor shaft, first select a spot and grind the inner race almost down to the shaft. (Caution: Do not touch the shaft with the grinder.) You will notice that the bearing race has changed color because of the heat generated during the grinding. This indicates that the hardness has been removed from the race. Now support the race 180 degrees from the grind spot and, with a hammer and chisel, break the race at the grind spot. (Caution: Never use a chisel on a bearing race that has not had the hardness removed by heating.) To remove an outer race that is stuck in a housing where you cannot get to it, first select a bearing with the same outside diameter and lay it on the outside face of the hous- ing, centering it as well as possible. Draw a line on the housing around the bearing race. Using this line as the out- side diameter of the race, mark two spots 180 degrees apart and drill a small hole at each mark. Using a hammer and a small punch, alternate between the holes and tap out the old bearing race. Be sure to reseal those holes with silicone sealant to prevent future contamination. Cleaning If a bearing has become contaminated, it must be cleaned. To do this, first carefully remove the seals or shields from both sides of the bearing. Then remove all the old grease and any particles that are present. After the bearing has been washed, blow out all the cleaning solvent so it will not con- taminate the new grease. (Caution: Never spin a bearing using compressed air — it will destroy the bearing and can cause it to fly apart.) Inspection of housings and shaft After the bearings have been removed, the D.E. and S.R.E. housings, as well as the shaft, must be inspected for imperfections. Even the smallest gouge or raised area in the housing or on the shaft will translate into a gouge or raised area on the bearing race and shorten the new bearing’s life. Slip fit vs interference (press) fit When a bearing can be slipped into a housing or onto a shaft without pressing, this is called a slip fit. Just the opposite, as the name implies, is a press fit, which is when pressure is required to install the bearing. A bearing should never require a press fit on both the inner and outer races. Nor should both races be a slip fit. If both races are a press fit, you will lose the clearance between the balls and the races as the bearing heats and expands. If both races are a slip fit, the excessive clearance will allow the races to move, causing possible misalign- ment. Both these conditions will shorten the life of the bearing, shaft and housing. Also remember that knurling a shaft or housing may create a press fit where a slip fit is required. Pa a Figure 4. “Brakes” for bearings include “0” rings, wave washers, “C” rings and tolerance rings. Tolerance rings and other “brakes” Alternators with needle bearings don’t need brakes Most early automotive alternators had a ball bearing in the drive end and a needle bearing in the slip-ring end. The most common exceptions were Motorola and Prestolite, which had ball bearings at both ends. In alternators with a needle bearing, the D.E. bearing is secured into the D.E. frame with a retainer and the rotor is allowed to expand and contract by moving in and out of the needle bearing about .007 of an inch. This movement is caused by the dif- ference in expansion rates between the aluminum end frames and the steel rotor. With this type of set-up, the slip-ring end of the rotor shaft usually serves as the inner race of the S.R.E. bearing,